- Creating KPIs
- Adding Data Manually
- The KPI Screen Explained
- Targets
- Assigning KPIs & Targets to users
- Calculated KPIs
- Threshold indicators (RAG)
- Weighted Averages
Adding Data Manually
Manual data entry provides a straightforward way to collect data from your users, enabling you to quickly populate Dashboards, Reports, and Analytics.
Contents
- Entering Data
- Selecting Dates
- Choosing Other Users
- Adding Notes
- Changing Targets
- Importing Data from Excel
- Multiple View Data Entry
- Arranging KPIs in the Data Tab
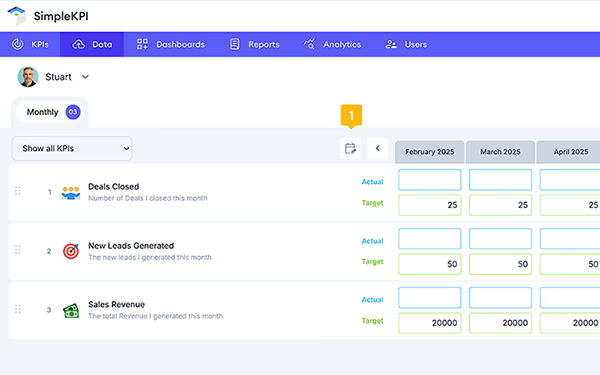
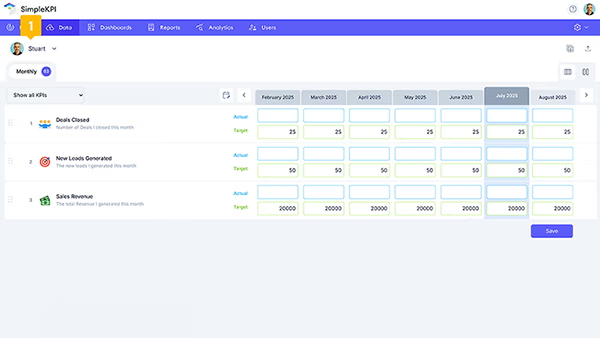
Entering Data Manually
Entering KPI data in SimpleKPI is designed to be intuitive and efficient. The data entry page features a clean, spreadsheet-style layout that allows you to quickly input information and seamlessly tab between fields.
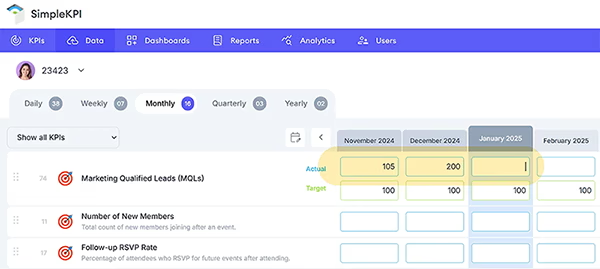
- Select KPIs by frequency, such as Daily, Weekly, or Monthly, using the corresponding tabs.
- Each KPI displays its name, target (if applicable), target %, trend, and any associated notes.
- Enter data in the "Actual" column to record values for your KPIs.
The Target % and Trend are calculated automatically, and data is saved in real-time without requiring manual saves.
Use the KPI category drop-down filter to organize KPIs by category.
To update historic data, navigate using the calendar control and adjust the entries as needed.
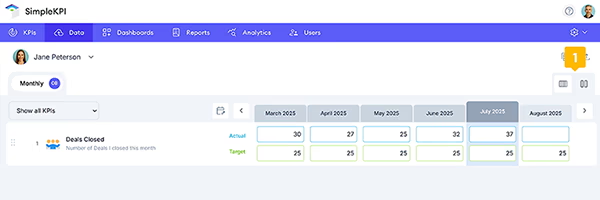
Selecting Dates
Dates are determined by the frequency of your KPIs (e.g., daily, weekly, monthly). The interface includes tabs to organize KPIs based on these frequencies.
- To select a date, click the calendar control.
- The default date is set to today’s date.
- To change the date, use the arrow and drop-down controls to navigate through months and years, then select a specific date.
Use the navigation arrows before and after the date to move between entry periods.
Choosing Other Users' KPIs
Managers, Directors, Admins, and Owners can select another user's KPI sheet and enter data on their behalf.
- Select the user’s name from the drop-down menu.
- Choose the user you want to view or edit.
- The selected user’s KPIs will appear in the KPI list.
- To switch users, repeat the process using the drop-down menu.
Adding Notes
Notes can be added to any data entry and will appear in reports and certain dashboard views.
- Click the note icon next to the KPI to add a note.
- Enter your note and click Done.
- The note icon will highlight, indicating a note has been added.
- To delete a note, click the note icon, clear the contents, and click Done.
Changing Targets
Certain user roles allow targets to be updated directly from the KPI entry sheet, which is useful for seasonal or changing targets.
- Click the target field and enter a new value.
- The updated target is automatically saved and applied to the KPI.
Importing Data from Excel
You can import data directly from Excel via the KPI Entry screen.
Learn more about importing data from Excel here.
Multiple Entry View
The data entry page layout can be switched to a multi-entry view, allowing you to input data for multiple time periods simultaneously.
To enable the multi-entry view, click the view toggle button.
Data entry functions similarly to the single view, but you can input values for several periods at once. Target information is displayed below the actual entry data.
Changing dates, scrolling through periods, and selecting KPI categories work the same way as in single view.
Note: The notes feature is disabled in multi-entry view. To add notes, toggle back to single view.
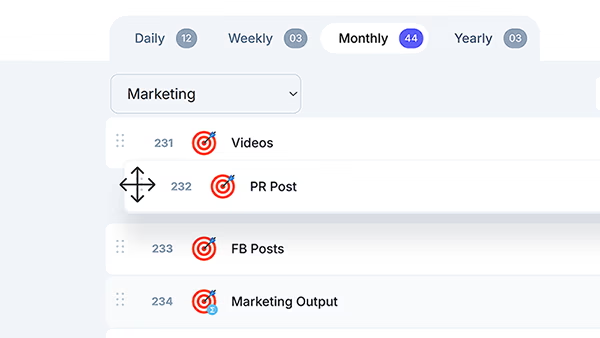
Arranging KPIs in the Data Tab
You can reorder KPIs in the data tab by hovering over the six-dot handle on the far left of the KPI row you want to move.
When the move cursor appears, click and drag the KPI row to its new position in the data entry sheeet.
After you move a KPI, your account remembers the new order, so the KPIs will appear in the same sequence the next time you open the data tab.