Inviting Users
Once users have been added to your SimpleKPI account, Owners, Admins, and Managers can invite them to access the system. Invited users receive an email with a secure link to set their password and sign in.
Users must be created in the Users tab before an invitation can be sent. This ensures that each invite is tied to the correct email address and access level.
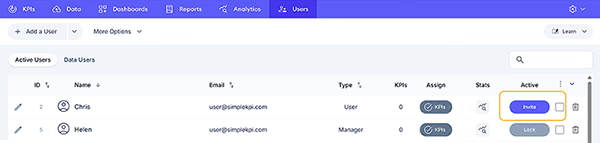
Navigate to the Users Tab
- Go to the Users section from the main navigation.
Inviting a Single User
- Ensure the user has been added on the Users tab.
- In the Users list, locate the user you want to invite.
- Click the Invite button in that user’s row.
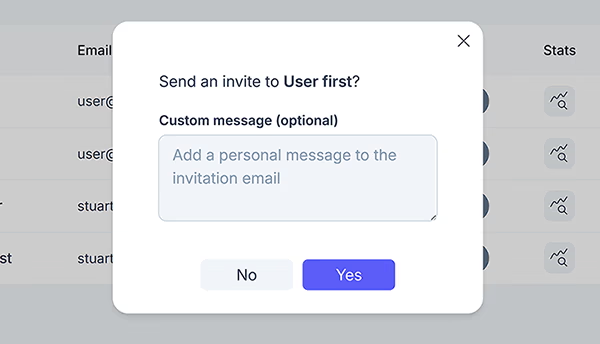
- In the invite dialogue, add an optional message to include in the email.
- Click Yes.
The user will receive an email containing a secure link. When they click the link, they will be taken to a page where they can set their password and then access SimpleKPI.
Resending an Invite
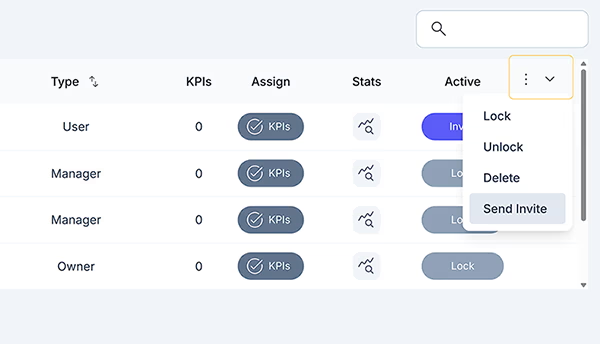
- Go to the Users tab.
- Find the user who has not yet received or used their invite.
- Click the Resend button in that user’s row.
A new invitation email will be sent to the same address, giving the user another opportunity to set their password and access the system.
Inviting Multiple Users at the Same Time
- Go to the Users tab.
- For each user you want to invite, click the select box at the far right of their row.
- Once all required users are selected, open the Actions dropdown.
- Select Invite users from the dropdown.
- In the invite dialogue, add an optional message to be sent to all selected users.
- Click Yes.
Each selected user will receive the same invitation email, with their own secure link to set their password and sign in.
More Reading
- Adding Users: Learn how to add full-access users before sending invitations.
- Assigning KPIs & Targets to Users: How to allocate performance indicators.
- Managing Groups and Permissions: Organize users and control access.
- Setting Up Your Account: Initial setup and configuration guide.